Thursday, 3 December 2015

ADDI EXPRESS KINGSIZE and my Dragon Scale Scarf

WOW! **Yawn and stretch**

I sincerely am sorry for taking so long to give you another post, it feels like I have been "Sleeping on the Job" and am waking from that slumber...

I got around to making a video demonstrating my new technique "Active  Crochet Cast Off"
and got a question on my YouTube Tutorial (opens in a new window).


This question was great, and what I forgot to mention, is that with a crochet cast off, you are not limited to a one stitch decrease. I have another pattern using my technique which involves active reshaping (a reversible flat scarf). 


On a personal note, I have been under the weather's spell... Now the sunshine is here it helps the day go by that much nicer... I have been trialing new medicine, and its good, but it seems I need bigger doses and they are just right in between to keep me coherent and active, its pretty great :) and maybe back to school for me...

Thursday, 30 October 2014

Neat Pattern - Tutorial review

https://www.youtube.com/watch?v=dgmXSrT1svY

Sheruknittingcom has a great channel :)
I am going to try this Pineapple Tape, if your going to try too, I am going to update FB

Tuesday, 29 July 2014

Hook Gauge by Yarn

Its often the case where I find yarn with no labels and this method has always worked for me...

Make 4 strips of your yarn...

Pull the 4 strips tight and "hover" over various sizes until you match the thickness of your strip with the width of your hook (or needles)

Like this match...

Tahdah!! I will use 4mm hook with this yarn! 

If you have fun yarn its a little more difficult to hold the "bits" in, sometimes I make my 4 piece strip shorter and tightly roll them in tape, this isnt always the best method for fun yarns but cant hurt to try. 
Your best bet is to search for the fun yarn and find label recommendations. 

Happy Hooking! 

Wednesday, 23 July 2014

Pintrest Picks - Crochet Wigs

I have been busy doing a beautiful large project, my blog has been a bit neglected... Oops! Anywho, while browsing my Pinterest pins I came across a few goodies to add to my favourites for tonight... I am posting from my phone at the moment and can only post pictures, but you can view my Pinterest page here:  http://www.pinterest.com/CrezzyCrochet/crochet-crafts/
Here are the pictures of my top 5 picks for the day:
NUMBER ONE:
This is actually a digital painting, but it is by far my favourite! I'm even considering dying my hair and making something similar RAWRRRR :)

NUMBER TWO:
The grown ups Cabbage Patch wig, need I say more? Hehe

NUMBER THREE:
A bit of a summer fun (like this one mainly because of the colour, but also for its FunFactor!)

NUMBER FOUR:
This one links to the creators pictorial of how she made this one, what a beauty!

NUMBER FIVE:
Who didn't love the "Tangled" movie? 
This ones just too cute not to mention!


Well thats my -Top 5 Tonight- watch for my Crochet Wig versions later on :)


Monday, 23 June 2014

ADDI EXPRESS & KINGSIZE Crochet Cast off Tool

I made this and it has been somewhat helpful, I held the post back because its "not 100%", in saying that... I love interaction  with other crafters and creative minds... So here is what I have so far... My thoughts are for a better "needle end" and a reminder not to roll up the tool when I'm done... Those kinks are hideously annoying lol
Here we go... 

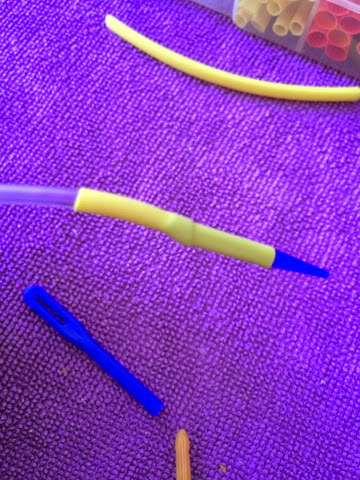
Tunisian cabled needle, wool needle, heat shrink, scissors
Trim the tail of cable
Cut wool needle and wedge into end of cable
Slide a snug fitting piece of heat shrink over needle and cable
Use a hair dryer on high setting to set heat shrink
The finished cast off tool :)

Enjoy!

Post your pics of your tool to my Facebook page http://facebook.com/CrezzyCrochet 
I look forward to seeing yours!

Wednesday, 28 May 2014

Heads or Tails?! ~No Snip'n'Sew method~

One of my "pet hates" with crochet projects are TAILS! The endless hours having to sew them in makes me wanna' ...!!!.... I usually try and work over them whenever possible, but we all know the tapestry needle is one of the things in our tool kits :)

The Trip Around The World Entrelac (Tunisian Crochet) Afghan by Brenda Borg (http://www.redheart.com/free-patterns/trip-around-world-throw) is a beautifully worked entrelac pattern. The trouble is all them fiddley little tails! At least there are with Mikey of the Crochet Crowds YouTube tutorial (love his tutorials though)... Kim Guzman has a Tunisian Entrelac pattern that is worked in straight rows too, its nice and can give the same "checkerboard effect" but sometimes all those beginning chains just make me wanna ...!!!... 
Anyway onto how i do this afghan without 100's of tails... This isnt a tutorial on how to complete the afghan plenty of other fantastic examples out there :)

Okidoki, here goes...
Once you have completed your first square, pull up the last loop big enough to pass your yarn ball thru
Then pull up, creating a slip knot
I like to join my second colour where the the first square tail is, so I can work that sucker in straight away hehe
Then, once you are doing the "7th stitch" lock the 2 tails in to it by yarning over with tails flat against the "7th stitch wall"


See? That 7th stitch locks the tails into the work :)

When you get around to where your first colour slipknot-tail is, you basically ignore it and carry on for the moment. 
The ignored blue tail (top right), and we have completed round 2 of the pattern. 
Do the same thing as you did with your first ball "Slipknot-Tail"

You could quite easy set this down SAFELY :)
Now onto round 3...
You want to move your starting point to the top right corner of the first square of the last round (whew what a mouthful!) then just draw up a loop. You dont want to make it too tight or too loose, you will be working over it at the end of the row. This does NOT count as a chain when you do the starting 7
This is what it looks like after starting row is finished. 
Once you have completed your first square it should look something like this, now you are going to work over that yellow tail to have it set higher ready for the next row. And don't forget, in round 3 and onwards, you will have inner worked squares (like this one is about to be) and outter worked squares like row 2. 
(Working over the slipknot-tail)
Once you have worked the 5th row, leave  the tail and continue around
This is what it looks like after completing the "slipknot-tail-lift" (woah cool terms huh? Hehe) and don't forget you have inner squares to work now... 
Once you get to the end, its the same again, SLIPKNOT-TAIL making. 
Pull up last loop on hook to pull yarn ball thru, then secure. 
This is what it looks like after round 3 and slipknot secured. 
Heres the back view...
YAY! No tails!!! Keep going like this for the rest of the pattern. Of course if you are using more than 2 colours, you will probably have tails still (if you don't work them in as you go)
Now onto round 4... 5... 6... Ahh?! You get it :)

Thats my way to do a two colour, "NO SNIP'n'SEW" method of the Trip Around The World Afghan :)

SLIPKNOT TAIL LIFT WORK OVER
Slipknot tail
Tail lift
Lift work
Work over
Over Slipknot
Slipknot tail
Tail lift
Lift work
Work over
Over slipknot...
Yes I'm getting carried away (should know me by now, thats MY normal hehehe)
Good luck with yours! 


Wednesday, 14 May 2014

Irish Rose Granny Square ~ by Leighla

There are a few different ways to do this, but here is my version. It sits flatter but still 3D and it is much neater than a few I have seen. 

START with Colour A, CH8, SS into first chain to form a loop

Step 2
CH6, *DC into loop, CH3* repeat 6 times and SS into the 3rd CH/DC (Makes 8 spokes) - bind off 

Step 3
With Colour B, SC join, CH2, 3 DC, CH2, SC in the same "spoke"


*SC, CH2, 3 DC, CH2, SC* in each "spoke around 

Join with a SS in the base of the first SC

Step 3
CH4, TURN, SS between the SC of each "petal"

*CH4, SS between petals* repeat around, SS join under first CH4, CH1

Step 4
TURN, *SC, CH2, 5 DC, CH2, SC in CH4 space* repeat 7 more times
SS join in bottom of first SC

Step 5
(Like step 3) TURN, *CH6, SS between SC of petals* repeat around, SS under first chain space made, CH1

Step 6
(Like step 4) TURN, *SC, CH2, 7 DC, CH2, SC in each CH6 space around, SS join in the bottom of first SC
BIND OFF


Step 7
TURN, SS join Colour C between SC's of petals, 

CH3, 2 DC in same space as SS, *CH 5, SC between next petals, CH 5, 3 DC-CH1-3 DC between next petals* repeat twice, CH 5, SC between next petals, CH 5, 2 DC in same space as starting SS, CH 1, SS join in CH3/DC, CH1, TURN

Step 8
SS into CH1 space, CH3, DC in same space, *DC in each of the next 3 DC, 4 DC in CH5 space, DC in SC, 4 SC in next CH5 space, DC in each of the next 3 DC, 2DC-CH1-2DC in CH1 space* repeat around and for last "corner"- 2DC in CH1 space, CH 1, SS join to CH3/SC
BIND OFF


COMPLETED :)
You could continue around with a DC in each DC and 2DC-CH1-2DC increase in each corner. 

Front view

Back View

Hope you enjoyed that :) 

~CrezzyCrochet~